You are Here:
Linux Lite 6.6 FINAL Released - Support for 22 Languages Added - See Release Announcement Section


Things To Do After Installing LinuxLite

Author (Read 27908 times)

0 Members and 1 Guest are viewing this topic.

Re: Things To Do After Installing LinuxLite
« Reply #9 on: February 07, 2019, 08:49:27 AM »
 

MohamedKhaled

  • Forum Regular
  • ***
  • 121
    Posts
  • Reputation: 10
  • Using Dell Inspiron 6400
    • View Profile

  • CPU: Intel Core 2 Duo t7400 2.16GHZ-2.17GHZ

  • MEMORY: 2Gb

  • VIDEO CARD: Mesa DRI Intel 945GM
Came back to linux few months later, glad i decided to write this ;D
Just Installed Linux lite??? check this tutorial
Have I Helped? Click [Thanks] button to the right.
Yours,
Mohammed Khaled
 

Re: Things To Do After Installing LinuxLite
« Reply #8 on: August 31, 2018, 05:08:16 AM »
 

MohamedKhaled

  • Forum Regular
  • ***
  • 121
    Posts
  • Reputation: 10
  • Using Dell Inspiron 6400
    • View Profile

  • CPU: Intel Core 2 Duo t7400 2.16GHZ-2.17GHZ

  • MEMORY: 2Gb

  • VIDEO CARD: Mesa DRI Intel 945GM
May I ask what are your credentials to suggest LL users to do these things, especially when you say
that "you are doing this on your risk" and yet, YOU want credit?
Hi thanks for replying i think that i stated (not sure) that i tried everything on the list and for a good amount of time but you have for example this step
Step 1 :
Go to Menu and search for software & updates (pic 1)
Quote
pic 1 by Mohammed Khaled, on Flickr
Choose download from and choose the main server (pic 2)
Quote
pic 2 by Mohammed Khaled, on Flickr
Go to other software and tick Canonical Partners (if it wasn't ticked already) (pic 3)
Quote
pic 3 by Mohammed Khaled, on Flickr
Choose close and press reload in the next window (you need internet)

basically if someone followed me in rush and instead of ticking canonical updates he UNTICKED EVERYTHING he will be harming himself badly instead everything in this tutorial won't and shouldn't cause any problems (except for that zram step I totally explained that) and even for zram as I stated I used it for 6 months and it gave me a major boost without any harm ,
I don't want people coming saying that I ruined their software (again it won't happen long as that you follow me carefully) while actually, it was them being careless
Nice screenshots btw, I give you that. Nothing personal :)
thanks, and yup sure you proved your opinion in a polite way don't mention it

EDIT after thinking about that for a while I think that its stupid move of me to add such disclaimer when clearly my first approach here is safety simplicity and fool-proof  :) thanks for your reply and contribution
« Last Edit: August 31, 2018, 07:17:45 AM by MohamedKhaled »
Just Installed Linux lite??? check this tutorial
Have I Helped? Click [Thanks] button to the right.
Yours,
Mohammed Khaled
 

Re: Things To Do After Installing LinuxLite
« Reply #7 on: August 29, 2018, 03:16:35 PM »
 

kpanic

  • PayPal Supporter
  • Forum Regular
  • *****
  • 162
    Posts
  • Reputation: 67
  • Linux Lite Member
    • View Profile

  • CPU: Core i5 M450

  • MEMORY: 8Gb

  • VIDEO CARD: Nvidia GT216
May I ask what are your credentials to suggest LL users to do these things, especially when you say
that "you are doing this on your risk" and yet, YOU want credit?

Nice screenshots btw, I give you that. Nothing personal :)

« Last Edit: August 29, 2018, 04:37:30 PM by kpanic »
 

Re: Things To Do After Installing LinuxLite
« Reply #6 on: August 28, 2018, 03:21:41 PM »
 

MohamedKhaled

  • Forum Regular
  • ***
  • 121
    Posts
  • Reputation: 10
  • Using Dell Inspiron 6400
    • View Profile

  • CPU: Intel Core 2 Duo t7400 2.16GHZ-2.17GHZ

  • MEMORY: 2Gb

  • VIDEO CARD: Mesa DRI Intel 945GM
sudo nano /etc/sysctl.conf
add at the file bottom: vm.swappiness=10
CTL+X, then y, then exit.
Reboot and check: cat /proc/sys/vm/swappiness
should return 10

TC
Yes this should work for other operating systems but i wanted to keep users out of terminal as possible luckly LL has gedit tool
Just Installed Linux lite??? check this tutorial
Have I Helped? Click [Thanks] button to the right.
Yours,
Mohammed Khaled
 

Re: Things To Do After Installing LinuxLite
« Reply #5 on: August 27, 2018, 04:26:09 PM »
 

trinidad

  • Platinum Level Poster
  • **********
  • 1461
    Posts
  • Reputation: 212
  • Linux Lite Member
    • View Profile
    • dbts-analytics.com

  • CPU: i7 4 cores 8 threads

  • MEMORY: 16Gb

  • VIDEO CARD: Intel HD graphics

  • Kernel: 5.x
sudo nano /etc/sysctl.conf
add at the file bottom: vm.swappiness=10
CTL+X, then y, then exit.
Reboot and check: cat /proc/sys/vm/swappiness
should return 10

TC
All opinions expressed and all advice given by Trinidad Cruz on this forum are his responsibility alone and do not necessarily reflect the views or methods of the developers of Linux Lite. He is a citizen of the United States where it is acceptable to occasionally be uninformed and inept as long as you pay your taxes.
 

Re: Things To Do After Installing LinuxLite
« Reply #4 on: August 27, 2018, 09:51:28 AM »
 

MohamedKhaled

  • Forum Regular
  • ***
  • 121
    Posts
  • Reputation: 10
  • Using Dell Inspiron 6400
    • View Profile

  • CPU: Intel Core 2 Duo t7400 2.16GHZ-2.17GHZ

  • MEMORY: 2Gb

  • VIDEO CARD: Mesa DRI Intel 945GM
Finally, it's complete and ready I tried to make it as fool-proof as possible share your opinion with me
Just Installed Linux lite??? check this tutorial
Have I Helped? Click [Thanks] button to the right.
Yours,
Mohammed Khaled
 

Re: Things To Do After Installing LinuxLite
« Reply #3 on: August 25, 2018, 12:44:38 AM »
 

MohamedKhaled

  • Forum Regular
  • ***
  • 121
    Posts
  • Reputation: 10
  • Using Dell Inspiron 6400
    • View Profile

  • CPU: Intel Core 2 Duo t7400 2.16GHZ-2.17GHZ

  • MEMORY: 2Gb

  • VIDEO CARD: Mesa DRI Intel 945GM
Special thanks to:
--You for reading and supporting
--@Jerry and the team of LL for such cool OS
--imgur.com the site I uploaded pictures on stupid imgur not letting me upload my pictures
--Flickr for really letting me upload my pictures
--EasyLinuxTipsProject for inspiring me and providing raw material and tbh (to be honest) helping me when I was at this point (https://sites.google.com/site/easylinuxtipsproject/)
--Grammarly Extension For Firefox  for scanning the whole tutorial for errors and mistakes
--@gold_finger for the documentary part  :) :)

                 Update Log
##Update## 2018/8/26 :
Added Almost all the tutorial
##Update## 2018/8/26 :
Added the remaining tutorial and some fixes here and there
##Update## 2018/8/31 :
Edited the disclamer as a respond to @kpanic's reply
Edited the first comment and cleaned many messes
« Last Edit: August 31, 2018, 07:34:43 AM by MohamedKhaled »
Just Installed Linux lite??? check this tutorial
Have I Helped? Click [Thanks] button to the right.
Yours,
Mohammed Khaled
 

Re: Things To Do After Installing LinuxLite
« Reply #2 on: August 25, 2018, 12:43:00 AM »
 

MohamedKhaled

  • Forum Regular
  • ***
  • 121
    Posts
  • Reputation: 10
  • Using Dell Inspiron 6400
    • View Profile

  • CPU: Intel Core 2 Duo t7400 2.16GHZ-2.17GHZ

  • MEMORY: 2Gb

  • VIDEO CARD: Mesa DRI Intel 945GM
(HUGE SHOUT-OUT FOR JERRY AND THE TEAM FOR MAKING SUCH OS, DURING THE WHOLE TUTORIAL WE ALMOST OPEN THE TERMINAL ONLY 3 TIMES WHILE ON OTHER OSES ITS ALMOST 10 TIMES)

so let's begin the tutorial :

Before installing new updates you want to make sure to have support for all updates for that to happen we need to activate 2 things :
Step 1 :
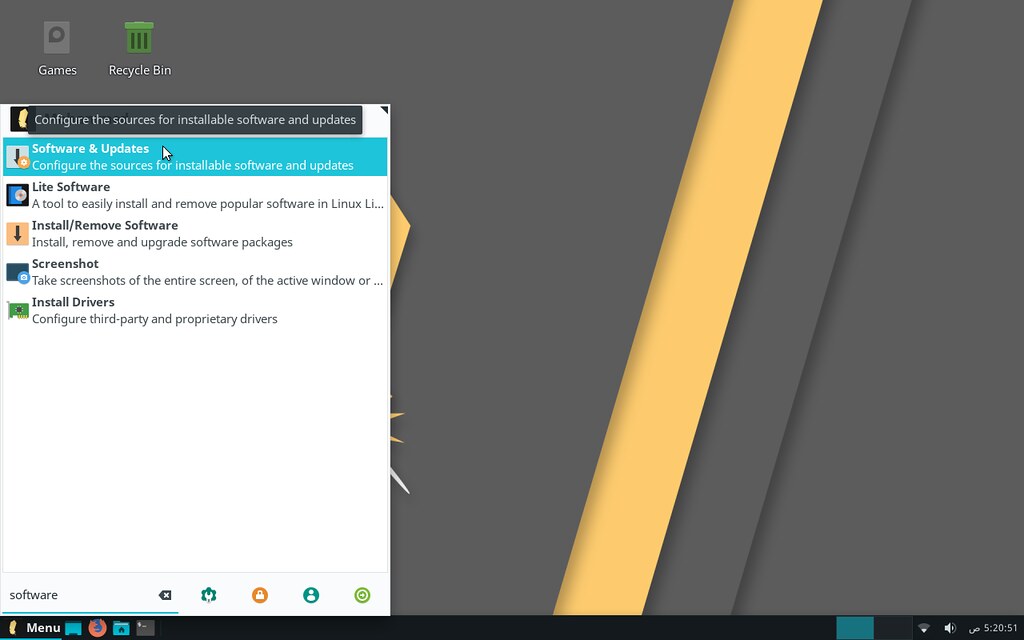
Go to Menu and search for software & updates (pic 1)
Quote
pic 1 by Mohammed Khaled, on Flickr
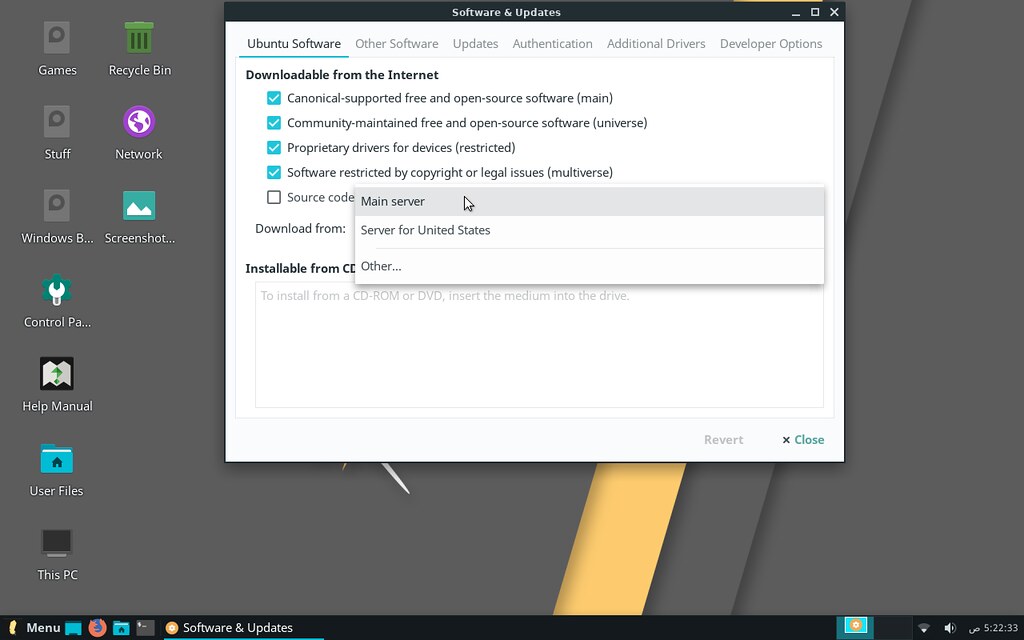
Choose download from and choose the main server (pic 2)
Quote
pic 2 by Mohammed Khaled, on Flickr
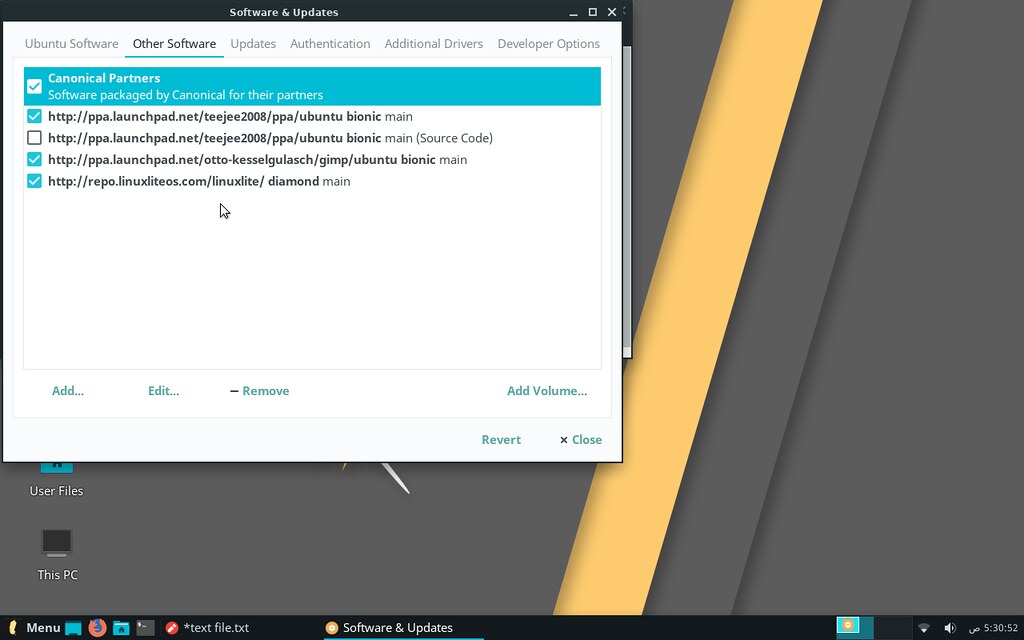
Go to other software and tick Canonical Partners (if it wasn't ticked already) (pic 3)
Quote
pic 3 by Mohammed Khaled, on Flickr
Choose close and press reload in the next window (you need internet)

Now we want to install updates
Step 2 :
Go to Menu -> Favorites -> Install Updates (pic 4)
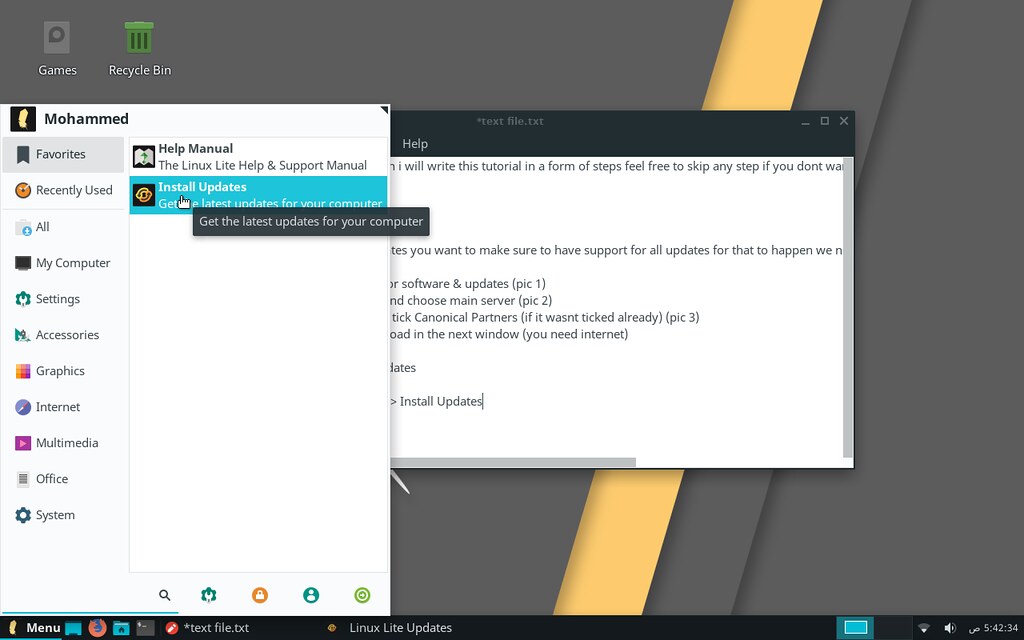
Quote
pic 4 by Mohammed Khaled, on Flickr
Press Continue and enter your password if required
Once Updates are finished restart your computer and go on !!

Step 3 :
Open Lite Software (pic 6)
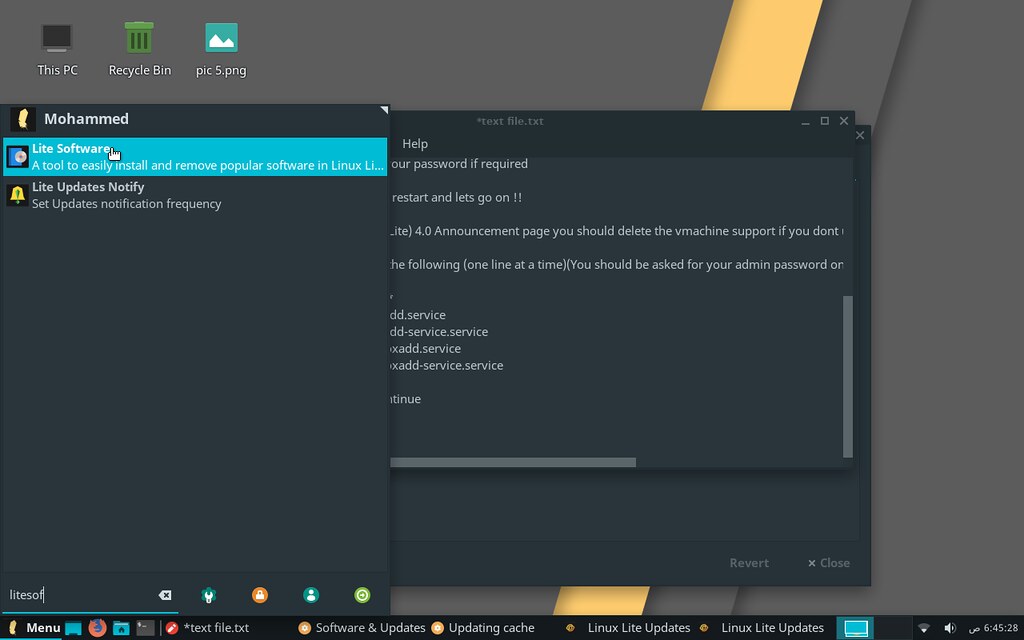
Quote
pic 6 by Mohammed Khaled, on Flickr
Press Yes (Important)
Choose install software
Mark The following(hold Ctrl on your keyboard and click) :
Wine -Restricted Extras -Steam (if you use it (a game platform)) -Torrent Software -PlayOnLinux and letterly anything you want
Press Install -> Yes

Step 4 :
As described on LL (Linux Lite) 4.0 Announcement page you should delete the vbox support if you don't use it

Open a terminal and type the following (one line at a time)(You should be asked for your admin password on the first line):
(pic 5)
Quote
pic 5 by Mohammed Khaled, on Flickr
Code: [Select]
sudo apt purge virtualbox*
Code: [Select]
sudo systemctl stop vboxadd.service
Code: [Select]
sudo systemctl stop vboxadd-service.service
Code: [Select]
sudo systemctl disable vboxadd.service
Code: [Select]
sudo systemctl disable vboxadd-service.service
Step 6:(only for very old computers(1gb ram))(do on your own risk)
Open lite tweaks (pic 7)
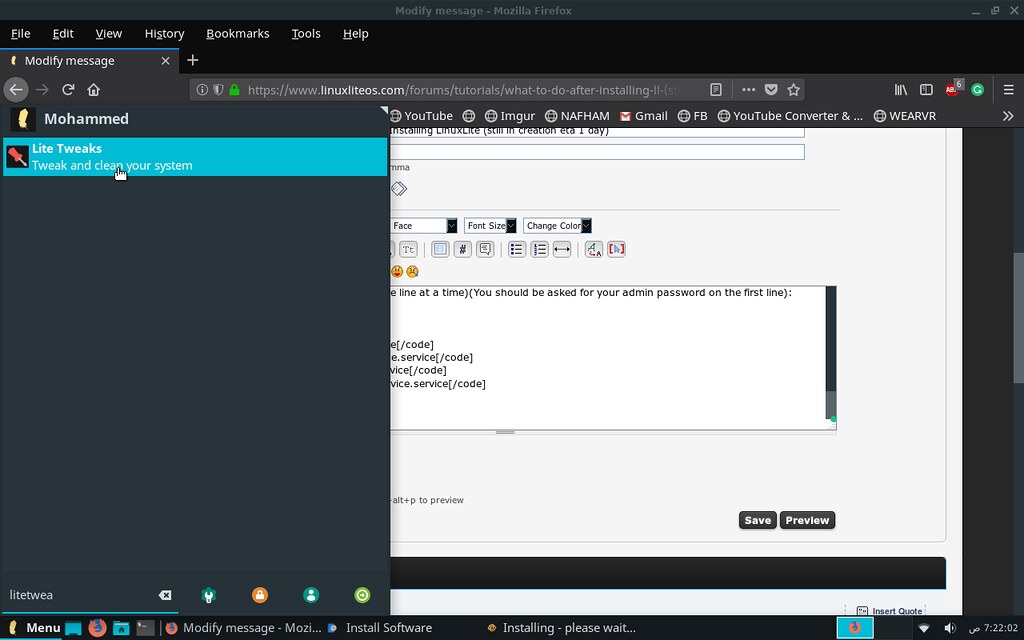
Quote
pic 7 by Mohammed Khaled, on Flickr
tick Zram and press begin (Zram is basically a kernel that allows you to compress stuff in the ram giving a cool boost on computes with low ram but really takes some CPU power also it's experimental so you should only use it if you really need it)
(i used it for 6 months with no problems tho.  ;))
Step 7: (only for laptops and battery users)
open lite tweaks as in step 6
tick TLP supports and click on Begin (TLP optimizes battery usage when on battery giving you almost 2 additional hours of usage)
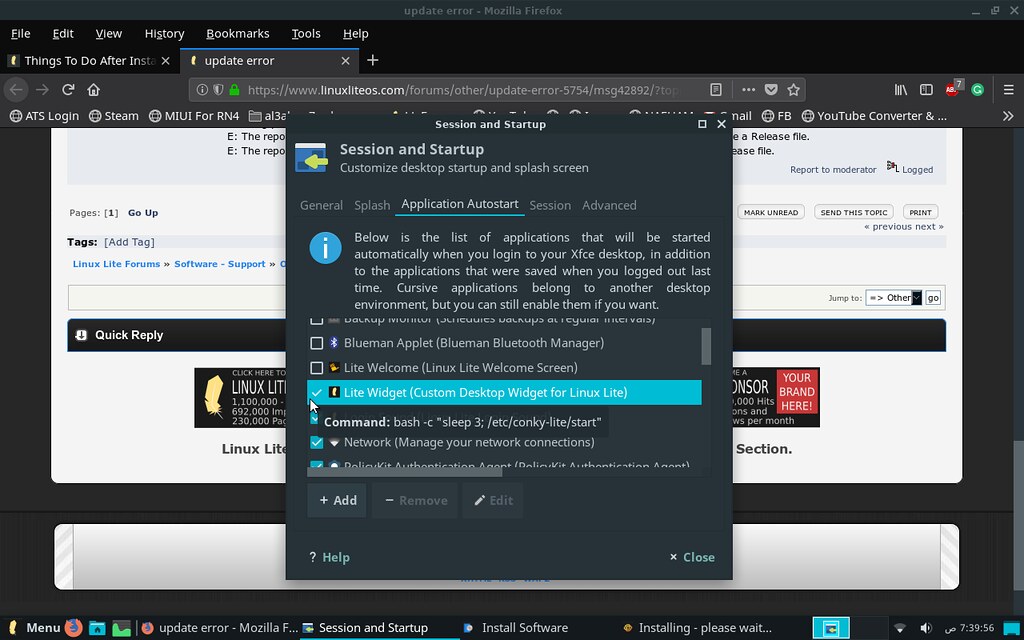
Step 8:(optional) it enables a widget that tells you the time if there is any updates system info etc
Go to session and startup (i suppose you know how at this point)
tick lite widget (pic 8)
Quote
pic 8 by Mohammed Khaled, on Flickr
save and restart to see the effect (you can always untick to remove it)

Step 9: (Only for computers or laptops with less than 4gb of ram (totally safe))
Ubuntu sets a swappiness value of 60 in other words if the FREE ram on your pc is less than 60 % your computer will start sending processes to your swap (swap speed is lower than ram speed (40 MB/s vs 2250 MB/s)) which is a pretty cruel value because if you have 1 GB of ram you will reach 40 % almost instantly and if you have 10 GB of ram still having 6 gbs of ram free is pretty enough

anyway, you can change this value :
open a terminal as in step 4 and write the following
Code: [Select]
gedit admin:///etc/sysctl.confif this result in error then maybe you don't have gedit installed, use the following command in terminal
Code: [Select]
sudo apt-get install gedit
ok next a text file will open
add the following two lines to the bottom of your text file (pic whatever idk)
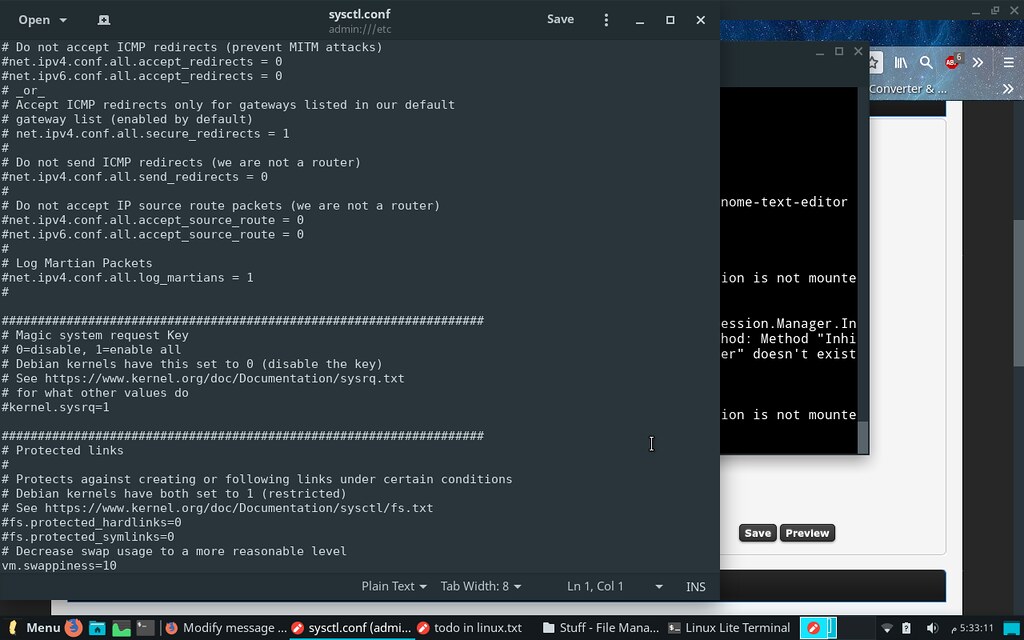
Quote
pic whatever idk by Mohammed Khaled, on Flickr
to check if that worked or not write the following line in the terminal (You should restart before that of course )
Code: [Select]
cat /proc/sys/vm/swappinessif the result is 10 congrats you made the most useful step in the whole tutorial ( ;D ;D)
Step 10 : now we want to edit the language - keyboard -language used system-wide
to do this we need to go to language support
(probably a message saying that language support isn't complete will pop up click on install and wait for some time)
next, you want to drag your custom language to above English so it isn't greyed out and press apply system-wide
ok the next step is to change the regional format because for me (Arabic) just sucks its translated well but written in reverse and with space between every letter and the other (its a problem in Ubuntu and not LL)
use show numbers text etc in this language and choose English (United States) (you can always choose other languages but you may encounter problems in this

Bonus Ok that's all I have, for now, this should get you up and running I wanted to keep this tutorial focused on essentials so I didn't add customizations even if I know that they are important (set the mouse acceleration to 4.0 in mouse and touchpad setting tho.  ;))
have I forgot anything, should I make another tutorial on the required customizations share your opinion
PS: Go see resources in this page should help you further https://www.linuxliteos.com/forums/tutorials/linux-basics-useful-beginner-information/
« Last Edit: August 29, 2018, 02:48:33 AM by MohamedKhaled »
Just Installed Linux lite??? check this tutorial
Have I Helped? Click [Thanks] button to the right.
Yours,
Mohammed Khaled
 

Things To Do After Installing LinuxLite
« Reply #1 on: August 25, 2018, 12:41:49 AM »
 

MohamedKhaled

  • Forum Regular
  • ***
  • 121
    Posts
  • Reputation: 10
  • Using Dell Inspiron 6400
    • View Profile

  • CPU: Intel Core 2 Duo t7400 2.16GHZ-2.17GHZ

  • MEMORY: 2Gb

  • VIDEO CARD: Mesa DRI Intel 945GM
--#You can just skip to the first comment to reach the tutorial
Quote
Read This Its Important :
Everything in this tutorial is tested and my approach here is safety first I will tell you if there is any tweak or harm in the tutorial although generally its all safe try to read slowly and take a breath every now and then,
completing this tutorial will make your os both  faster and will remove many hassles from you in days to come also remember to always ask others if you faced any problem, in general, you will save yourself some time and hassle lets fix the myth of Linus being a hard operating system
Before you start:
1- please reply if you found any mistakes
2- these settings are tailored for Linux Lite 4.x only using on other Xfce based OSes won't provide you with the full start and using on other DE (LXDE) will just cause errors. it may work on newer or older LL versions but for now, I only guarantee it to work in 4.x
3-Notes written in RED means that they aren't stable or can cause harm although others written in black are just fine and ones are written in Green means that they are user specific (old laptops only, modern PC only, etc )
So recently I installed Linux Lite 4.0 and then there was some stuff that I usually do when installing a new OS (installing updates installing a browser fixing a known bug or boosting performance etc) and usually I use this site which offers very good tutorials (https://sites.google.com/site/easylinuxtipsproject/first-xubuntu) but then every Linux OS is different and that's why they made a tutorial on installing Xubuntu Ubuntu etc instead of creating just one .
then I thought like if there is no any such tutorial for Linux lite and I have just installed LL why not make a one myself I'm sure this will be useful for newcomers as that following the tutorial above will result in errors because it isn't tailored for our OS.
##A Little Notice: although I will write this tutorial in a form of steps feel free to skip any step if you don't want that or if it isn't for you (coloured green for example)

Q & A

Why did you say that this is only for Linux Lite isn't LL based on Ubuntu so it should work on Ubuntu and other Ubuntu-based OSes?
A: there's some truth in the last statement but still LL is a custom OS that has many differences, for example, the lite apps which we use a lot during the tutorial and also the location of many programs may differ from OS to another that's why the tutorial focuses on Linux lite only

I'm facing trouble keeping with your tutorial /I can't find the option that you have?
A: You should read carefully especially the words between the brackets "()" or you can always write a reply and I will try to reply to you and help

Why did you write this tutorial here and not in a blog etc?
A: I don't really care for the profit in such things, when I first started using Linux I was obligated to do so because my laptop was too old to handle windows and at that time all I needed was such tutorial, I'm sure that it will be useful for someone someday.

Where did you get that pictures from?
A: Pictures were captured from my desktop and uploaded to Flickr
« Last Edit: September 05, 2018, 07:55:32 PM by MohamedKhaled »
Just Installed Linux lite??? check this tutorial
Have I Helped? Click [Thanks] button to the right.
Yours,
Mohammed Khaled


-->
X Close Ad

Linux Lite 6.6 FINAL Released - Support for 22 Languages Added - See Release Announcement Section